
Kirigami Paper Diorama
23:57For my first project, I decided to create a paper diorama. This variation involves layering Kirigami to create a 3D effect. In case you guys are wondering, Kirigami is the Japanese art of paper cutting (from the Japanese "kiru" = to cut, "kami" = paper).
My fingers still hurt from cutting so I'll keep this short, but I promise you guys this is well worth it and that the only reason why my fingers hurt is because my precision knife isn't as sharp as I need it to be.
Things needed:
- 7 Oslo papers
- 2 pieces of 21cm × 6cm Oslo paper
- 2 pieces of 28.5cm × 6cm Oslo paper
- Adhesive (glue, magic tape, and double sided tape)
- Pencil
- Ruler
- Cutting tools (scissors, precision knife, and cutter)
- Cutting Matt
- 23.7cm × 16cm printed image of your design
Honestly you don't even need the cutter but I'm fussy over things. Haha.

Step 1. Usually I'd draw my design but got lazy at the thought of redrawing it 6 times. Anyway, start off by defining the layers of your image. Y'know? Like which one's the foreground, background, mid-ground and such.

Step 2. Cut off the excess paper (the parts without print).


Step 3. Place 1cm margins on the sides of each Oslo paper. These will be the flaps that separate the layers. Then snip the edges so it doesn't bulk and crease once folded.

Step 4.Stick the image onto the center of the Oslo paper. Use magic tape to temporarily hold it in place.

Step 5.With the precision knife
Step 6.Repeat step 4 and 5 for each layer. The last layer will just be a plain sheet to close the diorama.

Step 7.Mark 1cm intervals on the 21cm × 6cm and 28.5cm × 6cm pieces to guide you on where to tape the flaps.


Step 8. This is the exciting part. Fold the flaps and tape them on the marked pieces. You will start to see your diorama form :D (You can actually use glue for this but I like sticky tapes. Haha. Also, if you overdo the glue, it warps the paper and will ruin your measurements.)
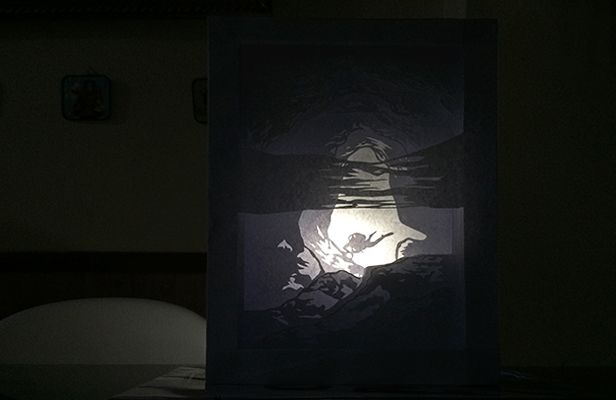
Step 9. Provide back lighting for the finished product. This step is unnecessary but adds a pretty cool and artsy-fartsy look for your diorama. Haha.
Conclusion. I'm actually happy with the result but I have learned some things I wish I knew before starting.
1. You may have noticed that I cut my image in half and paired different pieces together. I printed my image with inkjet
2. In the end, Oslo paper was too flimsy for my liking. I thought it would be a better option than illustration board which is pretty damn hard - wrong. I suggest using a folder instead, easy to cut but not as flimsy as paper.
I guess I lied about keeping it short. Ha!


0 comments